
The Windows Update Adventure - Phase 1
- ryan7169
- Jun 1, 2020
- 3 min read
Updated: Jun 5, 2020
Phase 1: Installing MS-DOS

Creating the Virtual Machine (VM)
I started off by creating a blank VM, indicating that the intended Operating System (OS) be "MS-DOS". I gave my VM the following settings:
1 Processor / 1 Core
64 MB of RAM
and 512 MB of preallocated HDD space (IDE)

In Options > Advanced, I disabled memory page trimming. During my dry run of this project, I found that memory page trimming caused instability in the old Windows OS VMs. We should keep this disabled.

Installing MS-DOS 6.22
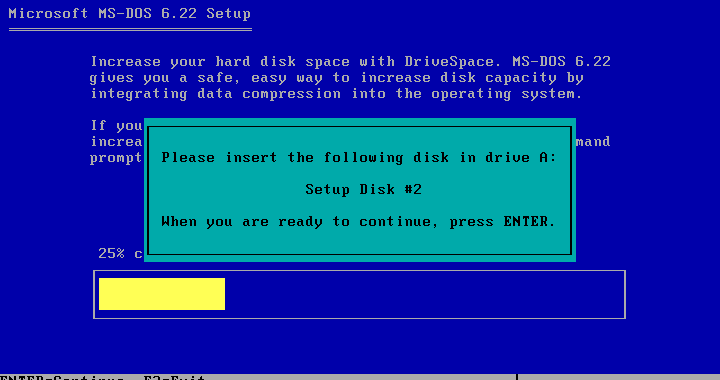
I started by adding a Floppy device to my VM and loaded the MS-DOS 6.22 Install Disk 1 image. Then I simply booted up the VM and followed the default on-screen steps:


Installing Supplemental Utilities
Afterwards, I wanted to install the additional utilities included with the Supplemental Disk. To do so, I entered:
A:\
Setup.bat C:\DOS
I then pressed A to install all of the components of the Supplemental Disk.
I also selected VGA as my display type by pressing F5 during the installation.


Installing CD-ROM and Network Adapter Drivers
Last but not least, we need to make sure we have our CD-ROM and Network Adapter drivers installed. You can find VMware drivers below:
CD-ROM:
Load up the CD-ROM Driver floppy image and launch the CD-ROM driver installer with the following commands:
A:\
Install.exe
Follow the default on-screen instructions and reboot the VM when the installation completes.


Network:
Now that we have a working CD-ROM driver, load up the driver pack ISO and launch the Network adapter driver installer with the following commands:
D:\
cd msclient
setup.exe


Install the network adapter drivers with the following steps below:
Install Directory:
C:\NET
Select an adapter from the list below.
*Network adapter not shown on list below . . .
Please specify the location (path) of the OEM driver you want to use.
D:\AMDPCNET\DOS
Select an adapter from the list below.
Advanced Micro Devices PCNET Family
Press Enter to setup for best performance.


User Name:
MS-DOS (or whatever you want to call this computer)
Select Change Network Configuration and press Enter.
Select Add Protocol and press Enter.
Select the protocol used on your network.
Microsoft TCP/IP


Press TAB and select NWLink IPX Compatible Transport
Press TAB and select Remove and press Enter.
Press Enter to confirm network configuration is correct.
Press Enter to confirm the listed options are correct.
OEM Driver Disk location (path)
D:\MSCLIENT
Press Enter to reboot the VM and complete the network adapter installation.


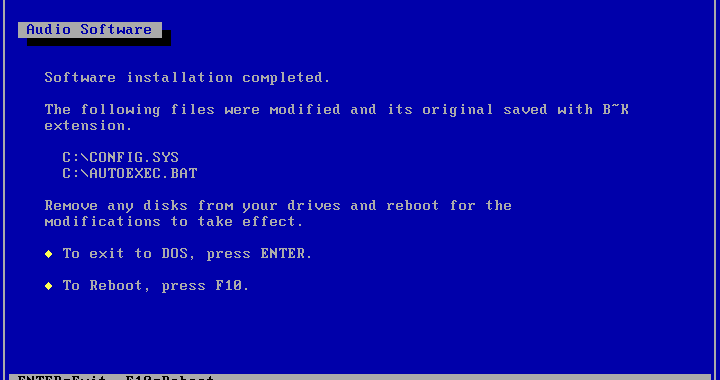
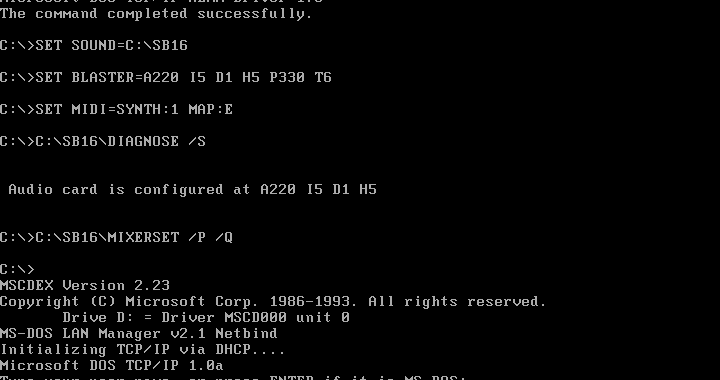
Sound Card:
Next, we should get our sound working. Load up the driver pack ISO and launch the sound card driver installer with the following commands:
D:\
cd SB16
Install.exe


Accept all the default settings in the installation wizard. This will install sound drivers for MS-DOS. Reboot after the installation is complete.


Troubleshooting Remaining Issues
As you can see in the previous screenshot, we received the following error upon startup after we installed the network adapter driver:
Error 8: There is not enough memory available.This is because by default DOS tries to load all drivers within the first 640KB of conventional memory. What we need to do is to set some drivers to load in the Upper Memory Block (UMB), but in order to do so we need to set a UMB provider (in our case, this will be EMM386).
In order to solve this issue, we need to enter the following command:
edit config.sysAdd/edit the following lines so they read as the following:
DEVICE=C:\DOS\HIMEM.SYS
DEVICE=C:\DOS\EMM386.exe noems
DOS=HIGH,UMB

DEVICEHIGH=C:\HXCD-ROM\CDROM.SYS /D:MSCD000
DEVICEHIGH=C:\NET\ifshlp.sys


Save and close. Then reboot your VM.
Upon reboot MS-DOS will prompt for your username and password. You can press Enter to confirm the defaults.
Your network adapter driver should now be working. You can test your Internet connection by using the following command:
//Ping Google DNS 8 times.
ping 8.8.8.8 -n8


Conclusion
And we're done!
Soon we'll be going through the installation of Windows 3.1. Please click the link below for the next phase of our Windows Update Adventure.
Cheers!
Comments